|
||
|
||
Nissan Motorsports Heavy Duty Torsion Bar Installation
The following are instructions on how to install the 27.48mm NissanMotorsports (Sway-Away manufactured) Torsion bars available at Xterraparts.com
Warning: Installation of torsion bars is not without risk. Torsion bars are under tension of the vehicle weight and if not released properly can cause injury to yourself and people nearby. If you do not feel confident working under these conditions you should have them installed by Nissan or a qualified mechanic. Proceed at your own risk.
Warranty: Installation of other than stock Nissan Torsion bars may be cause for Nissan to void part of your vehicle warranty. Individual dealerships vary in their position on this, so consult your dealer if you want to be safe.
Please post your experience with the torsion bar install, or any suggestions for improvement on the instructions at the Xterra4x4 message board. Pictures of your final install are appreciated.
What you need:
- 19mm socket wrench.
- 19mm closed wrench (2 is better but not necessary).
- 1 or 2 jackstands and/or floor jack
- Multi-purpose auto grease.
- 2 torsion bars
- Auto Marking pencil (for marking position of anchors)
- Measuring Tape
- Liquid Wrench (optional, for helping loosen adjusting bolts).
- Safety glasses (optional, but lots of dirt will be dropping in your face if you've ever taken the truck offroad)
Instructions:
Jack up and secure the truck.
Find a clean level surface for your truck. You'll be spending a lot of time underneath it, so get a tarp out if you don't have a garage. Put the truck in gear, and make sure the emergency brake is engaged. Jack up the vehicle, and remove the front tires. Place jackstands under the frame near the front. For extra safety you might want to put the tires under the A-arms in case a jack stand fails
Measure current torsion bar adjusting bolt.
Measure the distance from the top of your torsion bar adjusting bolt to the bottom lip of the frame crossmember (shown below in the two circles). The measurement will help you return the bolt to it's former position.
Remove the locking nut, unscrew the adjusting bolt and release the torsion bar boot.
There are two nuts above the crossmember attached to your torsion bar adjusting bolt. Remove the top locking nut first with your 19mm wrench. You will probably need another 19mm wrench or socket to keep the bolt from spinning. If you have never adjusted the torsion bar tension then the bolts are probably very tight and will require some liquid wrench to get things going. Then using a 19mm socket wrench remove the adjusting bolt from below. Next slide the rubber boot down the torsion bar away from where it attaches to the crossmember.
Removing the bolts completely from the torsion bar anchor (anchor is inside the crossmember and attached to the torsion bar: Item #4 in the picture above) is a necessary step towards releasing all the tension in the bar, and removing it.
Mark the position of the torsion bar anchor relative to the crossmember. (It should be noted that I did not do this in my installation.)
Later on when reinstalling the anchor you will want to have the anchor pointing to about 4 o'clock and 8 o'clock for the left and right anchors. Marking their position relative to the crossmember when you have removed tension will make it easier for you to check the correct position. I did not mark my anchors, and would like to hear from other installers if this is helpful or not. (please post on the Xterra4x4 message board).
Remove the torsion bar.
With the adjusting bolt removed the level of freedom in the torsion bar should make removing it an easy task. Move the bar towards the rear of the truck until it releases from the front anchor.
Grease the new torsion bar ends and differentiate between the left and right bars.
Apply a liberal amount of auto grease to the end grooves of the bar. Each end will be stamped with a L and an R denoting which side the bar should be installed on. Right and Left are relative to facing the front of the vehicle. On the Nissan Motorsports bars the stamps are on the front of each bar (so the R should be installed on the passenger side with the stamp on the front wheel side of the bar.
Refit the rubber boot and the metal ring to the new bars before installing.
When you remove the old torsion bar you need to keep the rubber boot (#1 in picture above) and the metal ring that comes out of the rear anchor. These will need to be reapplied to the new bar before installing.
Install the new bar in the anchors.
The grooves in the front and rear anchors make the bar very sensitive to installation angle when reinstalling the torsion bar. If possible put the rear anchor back into the crossmember loosely, then push the torsion bar into the crossmember hole. From that angle you will have better results trying to slide the torsion bar into the front anchor. After the bar is set into the front anchor you can move the loose rear anchor into position onto the torsion bar.
If you marked your rear anchors you should be able to fit them in the same position as when you removed the stock bars. If not, then at least try and keep them in the same position relative to each other.
Fit is relative.
I was unable to use arm strength to get the bars to seat into the anchors completely. It is up to you how you want to resolve this. I used a hammer on the rear anchor to drive the torsion bar into both the front and rear anchors. The last thing I want is a torsion bar dropping out at speed. Again, if you come up with a better solution please post.
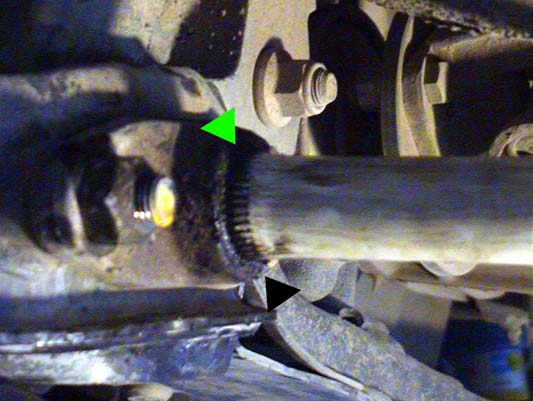
Also note that the Nissan Motorsport Torsion bar spline lengths are longer than the stock bars, so they will stick out from the anchors a bit. (see above and below shots of the spline lengths)
Tighten the adjusting bolt to move the anchors back into the crossmember.
As you tighten the adjusting bolt it will retract back into the crossmember. The last thing you want is this bolt sticking out below vulnerable to damage. If you took measurements of the height of your adjusting bolt coming out of the top of the crossmember you can get back to normal tolerances quickly. However since these are stronger torsion bars it might be a moot point. I used the frame height of another club members stock truck to gauge where they should be at.
Make sure your frame height is even, and double check your bolts.
Measure both left and right frame rail heights to make sure your bars are adjusted equally. You will need to put your tires back on and lower the vehicle back down to do this. Make sure you bounce the vehicle to even out the shocks. Make sure you locking nut is back on the adjusting bolt and that all your anchor bolts are tight. Also make sure that the rubber boots and metal rings are back in place.
That's it.
All you need to do now is schedule a realignment of your front end and you're ready to roll. Again, please post feedback so I can refine these instructions with your experiences.